
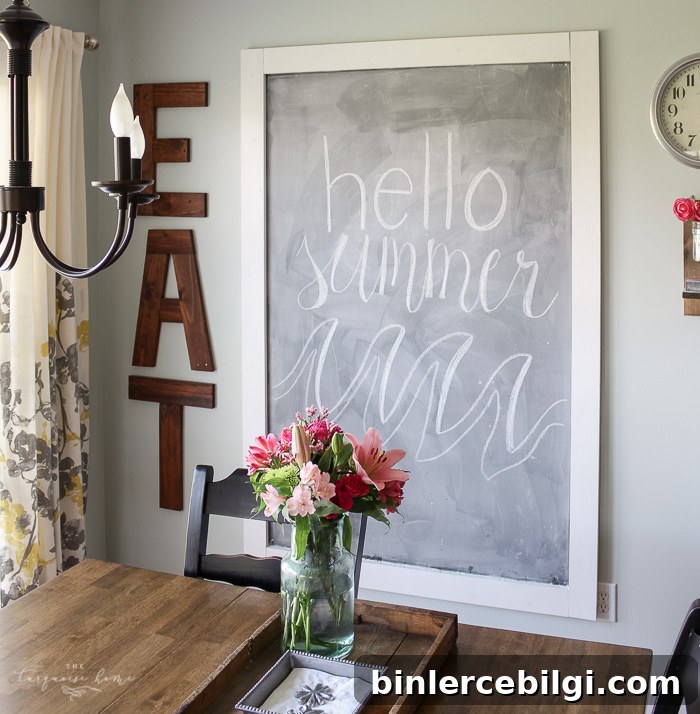
Make this easy DIY giant magnetic chalkboard with just a few tools and a little time. It’s perfect for writing inspirational messages, seasonal greetings, or for holding magnetic letters and notes.
I’ve wanted a large chalkboard like this ever since I saw one in Jess’s kitchen on The Macs last fall. Her huge chalkboard inspired me to create my own version that could serve as both art and a functional family board.

While out shopping at a neighborhood yard sale I picked up a can of chalkboard paint for just $2, and that was the push I needed to get started. After a bit of searching, I followed a few helpful tutorials and adapted the process to add magnetic properties under the chalk surface.
A quick note about magnetic primer: many hardware stores sell magnetic primer that you apply beneath chalkboard paint. It can give the surface some magnetic pull, but results vary. I’ll explain my experience with it in the steps below so you can decide whether to include it in your project.
This post mentions products and options I used while building the board.
Supplies to Make a DIY Giant Magnetic Chalkboard
These are the materials and tools I used to build a large framed chalkboard:
- 4 x 6 Masonite or hardboard, 1/8 inch thick — I had a 4 x 8 sheet cut down so the piece would be easier to handle.
- Magnetic primer paint (optional) — apply under the chalkboard paint if you want some magnetic hold.
- Chalkboard paint — for the writable surface.
- 1 × 4 lumber for the frame: one 8-foot board (cut into two 4-foot pieces) and two 6-foot pieces for the sides, or use molding of your choice.
- Chalk for seasoning and writing.
- Two D-ring hangers for hanging the finished board.
- 1/2-inch screws and nails to attach the frame and hangers.
- Level to hang the board straight.
- Circular saw or other cutting tool to trim the frame pieces to size.
- Paint or stain for the frame.
- Heavy-duty wall anchors appropriate for your wall type to secure the board.
This wall needed something large and bold to fill the space, and a giant chalkboard is both decorative and practical. Below are the steps I followed to create mine.
Steps for Making a Giant Magnetic Chalkboard
1. Paint the Masonite or Hardboard with Magnetic Primer (Optional)
I brought the hardboard inside and temporarily attached it to the wall to make painting easier. Taping newspaper behind the board protected the wall from drips and overspray.
Magnetic primer needs thorough stirring before and during application to keep the magnetic particles evenly suspended. I applied four thin coats, letting each coat dry as recommended. Although the finished surface had some magnetic attraction, small magnets slid down the board. Larger magnets held fairly well, so if you want true strong magnetism you may need to use heavier magnets or skip the magnetic primer and rely on alternative solutions.
2. Paint the Board with Chalkboard Paint
After the primer dried, wait the recommended time and then apply two even coats of chalkboard paint. Follow the manufacturer’s instructions for drying times between coats to get a smooth, durable finish.
3. Season the Chalkboard
Wait at least 24 hours after the final coat before seasoning the surface. Seasoning prevents the first marks you make from becoming permanent. To season, rub the side of a stick of chalk all over the entire board, then erase. This initial layer of chalk creates a base that helps future writing erase more cleanly. Be prepared for dust—cover nearby surfaces if needed.
4. Cut the Boards for the Chalkboard Frame
With the chalkboard seasoned and dry, remove it from the wall and lay it flat on the floor or a work table. Measure and cut the frame pieces: the long 6-foot boards worked well for the sides, and the shorter boards were trimmed to fit the top and bottom. I kept the cuts simple and square; mitered corners are optional if you prefer a more finished look and have the right saw.
5. Paint or Stain the Frame Pieces
Bring the frame pieces inside to paint or stain. I used leftover white trim paint and elevated the boards with push pins so they wouldn’t stick to the paper covering my work surface while drying. Choose a color or stain that complements the room where you’ll hang the board.
6. Attach the Frame to the Chalkboard with Screws
Place the boards face down and set the chalkboard on top. Secure the frame to the board using screws spaced evenly around the edge. Make sure the screws are long enough to hold the pieces together but not so long they come through the chalk surface.
7. Attach Hangers to the Back and Hang It Up
Attach two D-ring hangers to the back of the frame and use heavy-duty wall anchors suitable for your wall type. Use a level to ensure the board hangs straight. Anchors are especially important for large boards to prevent shifting or falling.
And that’s it—your giant chalkboard is ready. Mine cost about $50 total; the magnetic primer added a significant portion of that cost, so leaving it out can reduce the expense. I wrote one of my favorite verses on the board and plan to experiment with chalk lettering and seasonal designs. Chalkboard calligraphy is a fun skill to develop, and a framed chalkboard offers endless uses: family messages, menus, holiday art, and a place for kids to play.
More project ideas you might enjoy:
- 15 creative chalkboard ideas to inspire your own designs
- Seasonal chalkboard art and layouts
- DIY chalk and eraser holders to keep supplies organized
- Simple budget planning tips for home projects